The following information concerns the text-edited version of MicroSim PSpice, version 8. It is offered here solely for the purpose of helping undergraduate students complete their classroom assignments in computer-aided circuit analysis at the University of Texas at Arlington. No other use of these notes is supported by the University of Texas at Arlington.
The basic input file for PSpice is a text (ASCII) file that has the file type "CIR." In the beginning, this will be created by hand as the primary method of getting the circuit we want modeled into the PSpice program. Later, when we use the schematic capture program, it will create the *.CIR file for us, along with several auxiliary file types. Do not use a word processor to create these *.CIR files unless you "Save as" text or as ASCII. You can use Notepad to edit these files, but the best editor for this purpose is the one that is provided by MicroSim, called "TextEdit."
The output file always generated by PSpice is a text (ASCII) file that has the file type "OUT." I.e., if you submit a data file to PSpice named "MYCIRKUT.CIR," it will create an output file named "MYCIRKUT.OUT." This output file is created even if your run is unsuccessful due to input errors. The cause for failure is reported in the *.OUT file, so this is a good place to start looking when you need to debug your simulation model. You examine the *.OUT file with the TextEdit or Notepad programs. When everything works properly, you will find the output results in this file if you are running a DC analysis. If you are running a transient analysis or a frequency sweep analysis, there will be too much data for the *.OUT file. In these cases, we add a command to the *.CIR file that tells PSpice to save the numerical data in a *.DAT file.
The aforementioned *.DAT file is by default a binary (i.e., non-ASCII) file that requires a MicroSim application called PROBE for you to see the data. PROBE is installed with PSpice from the CD-ROM. If you want, you can change the default storage format to ASCII. This is not recommended because it requires more disk space to store the data in ASCII code. Later, we will describe the procedure for invoking PROBE and creating the *.DAT file. A companion file to the *.DAT file is the *.PRB file which holds initializing information for the PROBE program.
Another common method used by experienced PSpice users is the use of *.INC (include) files. These enable us to store frequently used subcircuits that have not yet been added to a library. Then we access these *.INC files with a single command line in the *.CIR file. Very convenient.
Other files used with PSpice are *.LIB files where the details of complex parts are saved; we may discuss this later, but it is unlikely that we will engage in LIB file alterations until you are taking advanced courses.
When we begin using the schematic capture program that is bundled with PSpice, we will encounter some additional file types. These are the *.SCH (the schematic data, itself), *.ALS (alias files) and *.NET (network connection files).
The above basic information is essential to using PSpice. Learn and understand these issues now to facilitate your use of the program.
The original SPICE program developed decades ago at U. C. Berkeley, accepted data only on BCD punch cards. That's why it was not case sensitive; developers have preserved this lack of case sensitivity for backward compatibility. In the original SPICE program, users were expected to designate nodes by number. Most users used small integers, and the numbers did not have to be contiguous. Today, most spice programs accept ordinary text for node designations. If you want to declare a node as "Pbus," you can. The only restriction seems to be that you can't embed spaces in a node name. Use the underscore ("_") character to simulate spaces.
Out of habit, most users of PSpice still use small integers as node designations. This often improves the readability of a PSpice source file or output file. In general, you should avoid extremely long textual names for node designations. Naming a node "Arlington_Junior_Chamber_of_Commerce" makes your files look choppy and hard to read. Also, you will sometimes have to type that long cumbersome name when you are performing analysis on the output data file. My suggestion is to use small integers as node designators for most cases. However, use short descriptive names for nodes whenever clarity is improved. "T1_col," when used to designate the collector node of transistor, T1, carries a lot more meaning than "37."
PSpice is a computer program used mostly by engineers and scientists. Accordingly, it was created with the ability to recognize the typical metric units for numbers. Unfortunately, PSpice cannot recognize Greek fonts or even upper vs. lower case. Thus our usual understanding and use of the standard metric prefixes has to be modified. For example, in everyday usage, "M" indicates "mega" (106) and "m" stands for milli (10-3). Clearly, this would be ambiguous in PSpice, since it is not case sensitive. Thus, in PSpice, a factor of 106 is indicated by "MEG" or "meg." "M" or "m" is reserved for 10-3. Another quirk of PSpice is the designation for 10-6. In most publications, the Greek letter, μ, is used for this multiple. Since there can be no Greek fonts (or any other special font designations) in PSpice, the early developers of PSpice borrowed a trick from those who used typewriters. Before the IBM Selectric typewriter was introduced, most writers of technical papers had to improvise for Greek letters. Since the Latin letter "u" (at least in lower case) sort of resembled the lower case Greek μ, it was widely used as a substitute for μ. Hence, either "U" or "u" stands for 10-6 in PSpice. Without further background explanations, these are the metric prefix designations used in PSpice:
An alternative to this type of notation, which is in fact, the default for PSpice output data, is "textual scientific notation." This notation is written by typing an "E" followed by a signed or unsigned integer indicating the power of ten. Some examples of this notation are shown below:
Here, we present the simplest circuit elements. Knowing how to model these ideal, linear circuit elements is an essential start to modeling more complex circuits. In each case, we will only present the most fundamental version of the part at this time. Later we will show you more sophisticated uses of the part models.
We begin with the DC version of the ideal independent voltage source. This is the default form of this class of part. The beginning letter of the part name for all versions of the ideal independent voltage source is "V." This is the character that must be placed in column 1 of the line in the text file that is used to enter this part. The name is followed by the positive node designation, then the negative node designation, then an optional tag: "DC" followed by the value of the voltage. The tag "DC" (or "dc" if you prefer) is optional because it is the default. Later, when we begin modeling AC circuits and voltage sources that produce pulses and other interesting waveforms, we will be required to designate the type of source or it will default back to DC.
One of the interesting uses of ideal independent voltage sources is that of an ammeter. We can take advantage of the fact that PSpice saves and reports the value of current entering the positive terminal of an independent voltage source. If we do not actually require a voltage source to be in the branch where we want to measure the current, we simply set the voltage source to a zero value. It still calculates the current in the branch. In fact, we require an independent voltage source in a branch where that branch's current is the controlling current for a current-controlled dependent source.
Examples:
*name +node -node type value comment
Va 4 2 DC
16.0V; "V" after "16.0" is optional
vs qe qc dc
24m ; "QE" is +node & "qc" is -node
VWX 23 14
18k ;
"dc" not really needed
vwx 14 23 DC -1.8E4 ;
same as above
Vdep 15 27 DC 0V
; V-source used as ammeter
Although PSpice allows for sophisticated temperature-dependent resistor models, we will begin with the simple, constant-value resistor. The first letter of the name for a resistor must be "R." The name is followed by the positive node, then the negative node and then the value in ohms or some multiple of ohms. The value of resistance will normally be positive. Negative values are allowed in order to permit an alternative model of an energy source. A value of zero, however, will produce an error. Later, we will introduce special resistor models that will permit additional analysis methods to be used.
The resistor is not an active device, so the polarity of its connection has no effect on the values of the voltages and currents reported in the solution. However, the current through a resistor is reported as that which flows from the node on the left to the node on the right in the source code line in which the resistor is entered. Thus .PRINT statements and PROBE queries that report resistor current may show negative values of current depending on the order in which you list the resistor's two nodes in the *.CIR file. If you want to see the resistor's current as a positive value, reverse the order of the nodes on the resistor's line in the *.CIR file and re-run the analysis. Nothing else will be affected and both solutions can be correct.
Examples:
*name +node -node value comment
Rabc 31 0 14k ; reported current from 31 to 0
Rabc 0 31 14k ; reported current changes sign
rshnt 12 15 99m ; 0.099 ohm resistor
Rbig 19 41 10MEG ; 10 meg-ohm resistor
The name of an ideal independent current source begins with the letter "I" in column 1 of the data file. As with the independent voltage source, we begin by introducing only the DC form of this part, but several other forms exist. Since the current source, is an active element, it matters greatly how it is connected. Designated current flows into the node written on the left, through the current source, out the node written on the right. As with the independent voltage source, the default type is DC. Remember that the so-called +node on a current source may have a negative voltage with respect to the so-called -node. This is due to the fact that the circuit external to the current source determines its voltage.
Examples:
*name +node -node type value comment
Icap 11 0 DC 35m
; 35mA flows from node 11 to 0
ix 79 24
1.7 ; "DC" not
needed
I12 43 29 DC 1.5E-4 ;
I12 29 43 dc -150uA ; same as
above
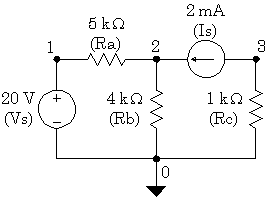
Example_1 EXMPL01.CIR
Vs 1 0 DC 20.0V ; note the node
placements
Ra 1 2 5.0k
Rb 2 0 4.0k
Rc 3 0 1.0k
Is 3 2 DC 2.0mA ; note the node placements
.END
The output file EXMPL01.OUT is below. This has been edited to remove extra lines.
Example_1 EXMPL01.CIR
<== Title Line
Vs 1 0 20.0V ; note the node placements
Ra 1 2 5.0k
Rb 2 0 4.0k
Rc 3 0 1.0k
Is 3 2 2.0mA ; note the node placements
Example_1 EXMPL01.CIR <== Title Line
NODE VOLTAGE NODE VOLTAGE NODE VOLTAGE NODE VOLTAGE
( 1) 20.0000 ( 2) 13.3330 ( 3) -2.0000 <==Results
VOLTAGE SOURCE CURRENTS
NAME CURRENT
Vs -1.333E-03 <== Current entering node 1 of Vs
TOTAL POWER DISSIPATION 2.67E-02 WATTS
JOB CONCLUDED
TOTAL JOB TIME .26
This was the bare-bones minimum problem we could ask of PSpice. Note that we obtained the node voltages which is sufficient information to calculate the resistor currents. However, there is another command that we can use to get even that done by PSpice.
One of the many "dot commands" in PSpice is the .PRINT command. It has many uses, but we will concentrate here on using it for printing DC voltages and currents. The .PRINT command can be repeated as often as necessary in an analysis. You can list as many items on a line as you wish.
However, we must keep in mind that the .PRINT command was designed to work with a DC or an AC sweep. This is a method of varying a parameter over a range of values so that we get a batch of cases solved all at once. Often, we do not actually want to run a sweep over many values of a parameter. We can circumvent the sweep by setting its range so that it can only run one value. Usually, a DC sweep is made by changing the values of a source; although we will later learn to sweep over other circuit parameters. For now, let's look at the syntax for a DC sweep command with the default linear type range.
.DC Sweep_Variable Starting_Value Stopping_Value Increment
For our example problem, we choose the voltage source and set the sweep variable range so that it cannot run more than one value:
.DC Vs 20.0 20.0 1.0
Since the starting value equals the stopping value, the analysis will only run for one case, i.e., for Vs at 20 volts. Remember that the only reason we are running the DC sweep statement is to enable the .PRINT command. The .PRINT command will not work unless there is a sweep going on. Note: What you enter in the .DC statement overrides any voltage value you may have placed in the part listing for the source.
In addition to printing the node voltages in which you type the letter "V" with the node number in parentheses, you can print the voltage between any pair of nodes; ergo, V(m,n) prints the voltage from node "m" to node "n."
.PRINT DC V(1) V(2) V(3) ; prints the node voltages
.PRINT DC V(1,2) ; prints the
voltage across Ra
.PRINT DC V(3,2) ; prints the
voltage across Is
To print currents, you type the letter "I" with the element name in parentheses. Note that the reported current is that which flows into the element from the node listed on the left in the *.CIR file, through the element, and out the node listed on the right in the *.CIR file. If you want to change the sign of the reported current in a resistor, then swap the two nodes for that resistor.
.PRINT DC I(Ra)
; prints the currents from + to - of Ra
.PRINT DC I(Rb) I(Rc) ; prints the currents through Rb and Rc
.PRINT DC V(1,2) I(Ra) ; voltage and current for Ra
.PRINT DC V(2,0) I(Rb) ; V(2,0) same as V(2)
.PRINT DC V(3,0) I(Rc) ; V(3,0) same as V(3)
Example_2 EXMPL02.CIR
Vs 1 0 DC 20.0V ; note the node placements
Ra 1 2 5.0k
Rb 2 0 4.0k
Rc 3 0 1.0k
Is 3 2 DC 2.0mA ; note the node placements
.DC Vs 20 20 1 ; this enables the
.print commands
.PRINT DC V(1,2) I(Ra)
.PRINT DC V(2) I(Rb)
.PRINT DC V(3) I(Rc)
.END
The output file EXMPL02.OUT is below. This has been edited to remove extra lines.
Example_2 EXMPL02.CIR
Vs 1 0 20.0V ; note the node placements
Ra 1 2 5.0k
Rb 2 0 4.0k
Rc 3 0 1.0k
Is 3 2 2.0mA ; note the node placements
.DC Vs 20 20 1 ; this enables the Print commands
.PRINT DC V(1,2) I(Ra)
.PRINT DC V(2) I(Rb)
.PRINT DC V(3) I(Rc)
Example_2 EXMPL02.CIR
**** DC TRANSFER CURVES TEMPERATURE = 27.000 DEG C
Vs V(1,2) I(Ra)
2.000E+01 6.667E+00 1.333E-03 <== data for Ra
Example_2 EXMPL02.CIR
**** DC TRANSFER CURVES TEMPERATURE = 27.000 DEG C
Vs V(2) I(Rb)
2.000E+01 1.333E+01 3.333E-03 <== data for Rb
Example_2 EXMPL02.CIR
**** DC TRANSFER CURVES TEMPERATURE = 27.000 DEG C
Vs V(3) I(Rc)
<2.000E+01 -2.000E+00 -2.000E-03 <== data for Rc
JOB CONCLUDED
TOTAL JOB TIME .13
With a little bit of effort, we can get PSpice to do most of the work, most of the time. Note that using .PRINT has suppressed the default printing of all the node voltages. This is not a problem in our case because we printed all three node voltages anyway. Be sure that you include everything you need in the .PRINT statements.